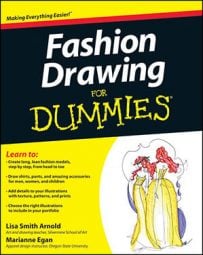
Draw a traditional short bob.
Shorter hairstyles can convey a cutting-edge look if they’re super short, or they can express more of a mom-around-town look if they resemble a classic bob.
Draw a head with the basic facial features mapped out and a lightly sketched hair outline that goes around the back of the neck, sides of the face, and top of the head. Follow the shape of the top of the head and include some space next to both ears.
To add bangs, draw a slight curve across the forehead starting at the top of one ear and ending at the top of the other ear. Fill in the hair by drawing lines of varying lengths, using both the point of the pencil and the side.
For texture, replace the smooth line at the ends of the hair with jagged lines.
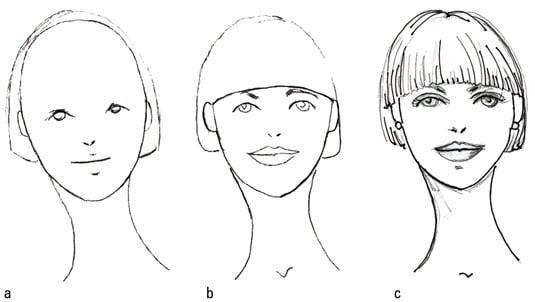
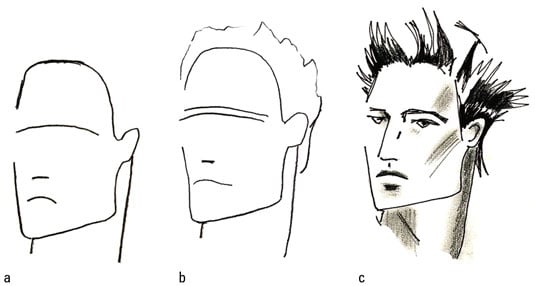
Create the edgy look of the super-short hairstyle.
Sketch a head with the basic facial features mapped out and a hairline started. Outline the overall shape of the hair, extending a little beyond the face.
Draw a series of short vertical lines whose roots follow the curve of the hairline. Shorten the lines as you approach the ears.
Vary the length of the lines, using both the pencil point (for dark lines) and the side of the pencil (for lighter lines) to create depth.
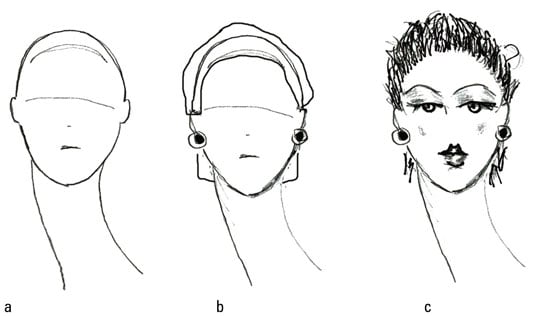
Draw a classic shoulder-length cut.
Draw an oval with a face grid. Add a neck. Add the hairline and outline of straight shoulder-length hair. Give the hair a side part.
Follow the head shape for the hairline. Draw curving lines that wrap around the head to the level of the ears and then add straight lines ending just above the shoulder. Sketch in your facial features.
Draw parallel lines that extend from either side of the part to indicate hair direction. For depth, add parallel lines behind the ears and at the ends of the hair. Include a few loose strands of hair for interest.
Use the side of your pencil to shade in the hair. Leave a few light areas for shine.
Draw long and lustrous locks.

Long hair is a gorgeous way to accent all clothes in fashion. Your drawing may show hair streaming over the outfit for a more editorial look, or it may show hair pushed off to the side to reveal a special collar.
Sketch out a woman’s head and neck in profile. Outline the shape of the hair.
Draw a curved line that goes toward the ear above the forehead. Draw a curved line outside the head that mimics that head shape and goes down to the level of the ears. Continue the curve outward to just past the neck, and then curve inward for long hair — the overall shape of the hair resembles an S.
Add curved lines of varying lengths and thickness to follow the shape of the hair. Add some thicker and darker lines for depth. More lines make for a darker shading effect. To create a head of long, full, and lustrous hair, continue adding more lines, including some darker lines and some lines that are a little wavy.
Create a formal updo.

What better way to show off a great gown, a long pair of earrings, and a lovely necklace than with a fabulous-looking updo? The good news is that you can draw an updo in much less time than it takes to have your own hair styled in an updo (and you won’t have to use tons of bobby pins or hairspray, either).
Draw a face in profile. Sketch in an updo hair shape using thick and thin curved lines that are longer in the middle of the hairdo. By drawing a side view, you can show both the front and the back of the style.
Fill in the hair using short lines near the hairline and longer lines of varying lengths that extend upward. Add shading for drama. Hair is usually darkest at the nape of the neck as well as where the hair folds up over itself when styled.
When drawing updos, think everyday ponytails, buns, French twists, half up and half down, and more — the varieties are endless!
Give your male fashion figures a head of short hair.
Sketch a square-jawed head shape for a guy, complete with the basic facial features and a hairline mapped out. Using a series of short, straight lines and a few curved lines, map out a short style with the hair ending at the top of the ears. Make sure the short lines follow the grain of the hair. Add shading for depth and shine.
The bald look to tight curls
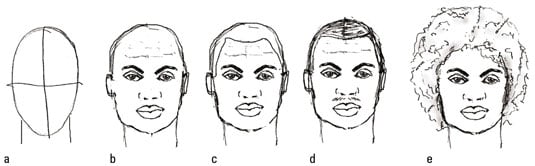
Sketch a square-jawed face for a guy, complete with the basic facial grid. Add in facial features and some shading around the lips for a manly five o’clock shadow. Then complete your hair look.
The bald look: Square off the top of the head slightly for a bald look. Add a few lines for the skin of the forehead to add dimension to the look.
Short hair: To add short hair, map out a hairline that starts by the ears and curves around the forehead. Make sure the forehead of the hairline has a U shape. Add some shading with the side of your pencil to add color and texture.
The Afro: Using a thin, squiggly line, map out a helmet-like shape around the face covering the ears and some of the forehead. You can decide the size of the Afro by how far out you want the outer perimeter lines of the hair to extend. Finish the look by adding short and long thin squiggly lines throughout the inside of the Afro.
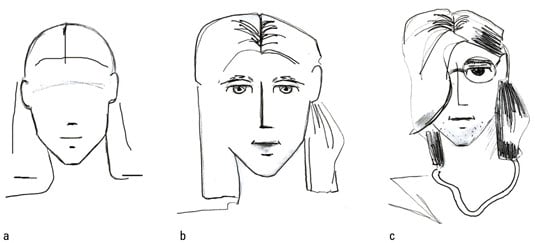
Create the free-spirit approach with longer locks for men.
Draw a square-jawed head for a more masculine look, and then map out the basic facial features. Sketch in a side part and an outline of where you would like the hair to fall.
For a shaggy look, add short and long lines in various shades to the ends of the hair, the parted area, in the front across the eye, and in the back toward the top of the head. Create dimension by leaving a little shadow at the top of the hair and along the sides, and leave white space to provide shine.
End the hair below the chin on one side, and make the hair on the other side chin length.
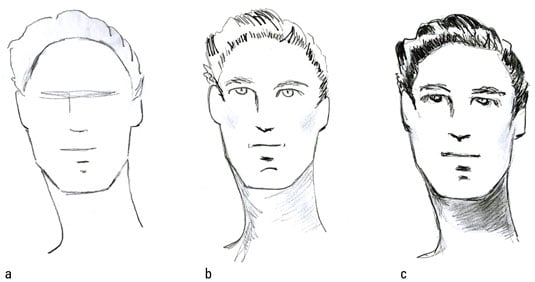
Create a mysterious smooth male look (without having to buy gel or pomade).
Sketch a male profile with a hairline to show the full benefits of smoothed-backed hair. For the hair, follow the shape of the head; curve all your lines away from the forehead or toward the nape of the neck. Taper the hair at the back and the side of the head for an elegant, more-controlled look. Add some shading and leave some white places for shine.
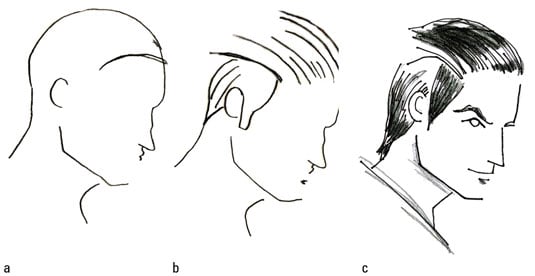
Give your fashion male figures a spiked and trendy coif.
Draw a man’s head in a three-quarter view with chiseled facial features mapped out. Place a hairline above his eyes. The distance from his eyes to his hairline should be about the same as the distance between his eyes and his mouth. Lightly sketch in the hair shape.
Use many clusters of short, vertical, straight lines to cover the head for style. Use shading for depth toward the hairline and the ears, and leave some white space.
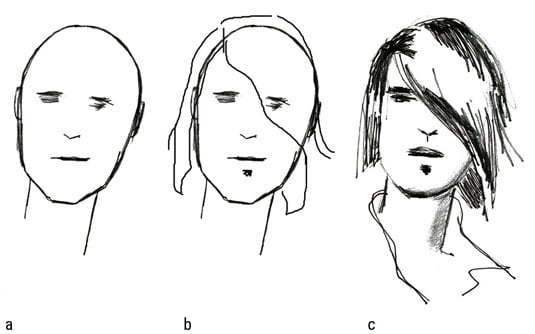
Convey a moody attitude for your male figures.
Draw a guy’s head, complete with basic facial features mapped out with the hairline starting just above the eyebrows. Add a few lines under the ears to map out the length.
Sketch the hair shape lightly and close to the head shape, stopping it just above the shoulders. Draw some hair tucked behind the ear on one side.
Add some hair going across one eye. For texture, draw a few lines near the center part, below the ear, and by the shoulders. Add shading in the hair around the ear and toward the back of the head for dimension.
Hairstyles for Your Child Fashion Figures
Nobody’s hair lays like a helmet around the face. Add a few stray hairs on top of the head for a cute effect.
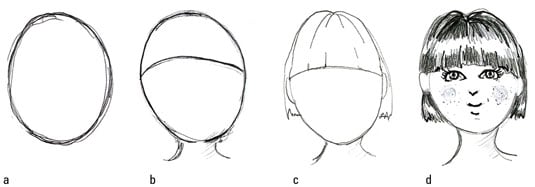
Draw a circle for a kid’s head.
Most children’s faces run on the round side, so a circle with little definition works best.
Sketch a curved line a little more than halfway up the circle across the forehead for bangs.
Draw the hair visible behind the ears, ending just below the ears. Also add lines for the part.
Make the ends slightly uneven so they resemble hair and not a helmet. Keep in mind that hair with bangs doesn’t have a true part, so draw a few lines downward and curving at the crown of the head to indicate that the bangs fall from that point.
Darken the lines at the crown using a pencil point, and add dimension and value by using your pencil to shade. Add shine by leaving some white space.
How to Draw Short Hair on a Boy Figure
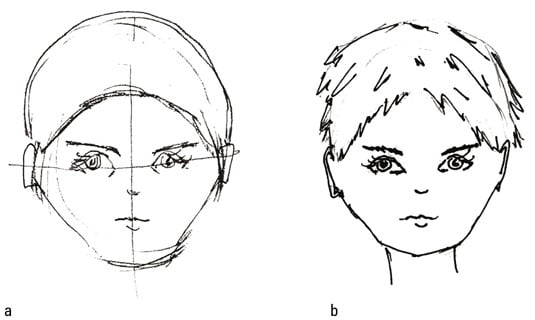
Draw a circle for a boy’s head. Add a face grid and facial features. Draw the hairline curving up from the ears and peeking over the nose.
Add jagged lines and blank spaces across the front of the hairline and along the outer perimeter of the hair, especially on the sides. Add a few broken pointy lines on the inside of the hair.
Ponytails, Pigtails, and Braids
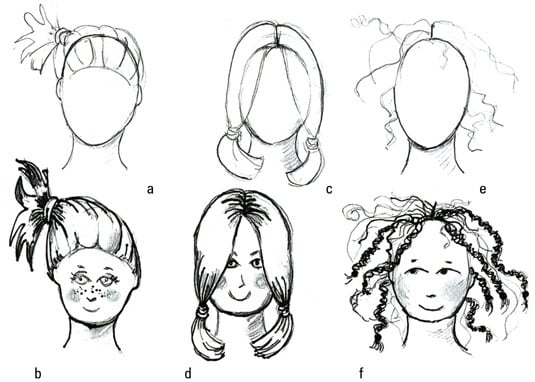
Draw a child’s head and add a hairline.
Keep the hairline slightly higher than an adult’s hairline; children tend to have larger foreheads and heads in proportion to their bodies. Most children’s heads run on the round side, so a circle with little definition works best.
Curve the hairline on the forehead to the ears. Draw a line above the head — the distance between this line and the eyes should be almost the same as the same distance from the eyes to the chin. Use parallel lines to show that the hair is pulled up from the sides to form a side ponytail toward the top of the head.
After you’ve tied or clipped hair up and back, hair flows from the tie or clip in an uncontrolled way.
Add shading around the hairline of the forehead and the ponytail holder. Darken a bunch of lines around the ponytail holder and the ends to add dimension to the hair.
For downward pigtails, try out these steps:
Draw a child’s head.
Most children’s heads are rounded, so a circle with little definition works best. Draw the head from the front to show the pigtail action.
Start with a center part, bring the hair down over the ears, and secure both sides with a tie or clip.
From the bottom edge of the tie or clip, draw a series of parallel curves for hair that reaches above the shoulders. Add shading and darker lines around the center part and where the hair bunches up around the tie or clip.
Here’s how to draw tiny braids:
Draw a child’s head. Sketch a series of zigzag lines and loops and curves for a curly look.
Most children’s heads are rounded, so a circle with little definition works best. Draw the head from the front with a center part so the braids show in all their glory.
Add dark and light lines with loose and tight loops. Add a few braids by using two to three lines of tight loops on top of each other, moving together away from the head. Draw a bead at the bottom of each braid.