If you have a bricks-and-mortar store, you need to claim your Places Page as it shows up in mobile Facebook. Then you have the opportunity to merge your Places information with your official business Page on Facebook. A good process would be to create your Official Business Page first and then go and claim your Places Page.
To claim your Place, follow these steps:
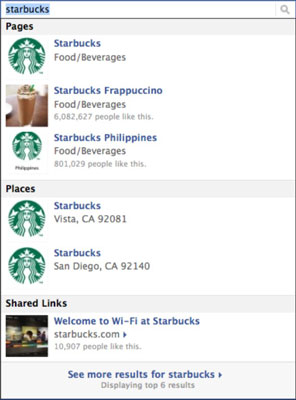
Go to Facebook and search for your business name.
You don’t need to be on a smartphone to do this step. Also, you can use the Search bar at the top of every Facebook screen.
If your business’s Place already exists on Facebook, click or tap it to visit its page.
If it’s a Facebook Places Page, it’s listed below the Places heading.
Click or tap the link titled Know the Owner? in the left column. You also have the option to click the gear icon under the Timeline Cover photo and choose Is This Your Business?
A pop-up window asks you to verify that you’re an official representative of the physical location.
Click or tap the verification check box and then click or tap the Proceed with Verification button.
You see a claiming-process page.
Enter your business information, and click or tap Continue.
To claim your business, Facebook asks you to provide the following information:
Official name of business
Business address
Business phone number
Business website
Third-party listing (such as a Yelp! or Better Business Bureau listing)
Your relationship with the location (such as Owner)
Verify your business by providing additional information.
You’re asked to verify that you’re the owner of the business through an e-mail or a document-verification process.
Your e-mail address must be a business address (one that has your business name in the domain name). If you choose document verification, you have to provide scanned images of a phone or utility bill that includes the business’s name and address.
Click or tap Submit.
After your claim is confirmed, you own your Place on Facebook. Even though you already have all the information that a Places Page contains on your regular business Page Info tab, by claiming your Place, you can manage your Place’s address, contact information, business hours, Profile picture, Admins, and other settings that people see in their Facebook mobile application.
Now you can go back to your computer, search for your Places Page, and edit the settings or provide more information.
Facebook may ask you whether you want to merge your Places Page with your official business Page. Merging your business Page with your Places page is a good idea because it retains everything from your business Page (photos, posts, events, video, ads) and adds a map, check-ins, and a place on the Page Timeline for recommendations.
You can see that the number of check-ins (shown as were here) appears in the data beneath the business’s name on this merged Page. If you see a number here when viewing from a non-mobile device, you know that the Pages have been merged.
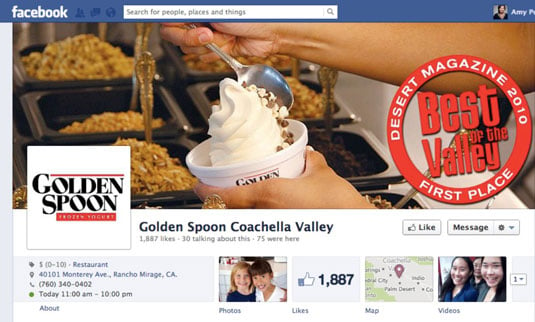
Notice the addition of the Check In button on this view of the same Page from a mobile device.

When you create a Place or merge a Place and a Page, you have the option to add a Recommend This Place button that appears on the right sidebar of the Page for users who live near that business. This feature is a great opportunity for your business, because users can write a recommendation of the business, which goes out into the News Feed and is shown to those users’ Friends when they visit the Page. It’s fantastic exposure!
If you don't see the Recommend This Place button, follow these steps:
From your Pages/Places Page, click Admin Panel.
Click Edit Page.
Click Update Info.
Select the Show This Map on the Page check box.
Facebook allows Recommendations only for Pages that have not only provided a physical location but chose to display a map within their applications. If you deselect the check box to display the map, the Recommendations box disappears.