


Shipping settings on Amazon
Your shipping settings establish the default shipping service levels for orders you ship to buyers (Fulfillment by Merchant, not Fulfillment by Amazon). Amazon requires standard shipping for all sellers but allows you to offer other shipping level options such as expedited and two-day.To check and (optionally) change your shipping levels from Seller Central, go to Settings, Shipping Settings. The Shipping Settings page appears, as the figure shows.
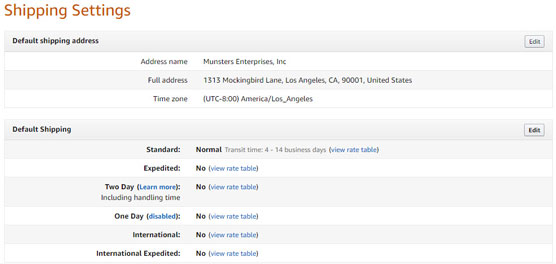 The Shipping Settings page.
Check the default shipping address at the top. If you’ll be shipping from a different location, press the Edit button, enter the location’s name and address, and press Save.
Under Default Shipping are the available shipping service levels. Initially, the only level you’re set up to offer to shoppers is Standard. Next to this option is “Normal,” indicating a standard transit time of four to 14 days. All the other service levels have “No” next to them, indicating that you don’t offer these shipping service levels.
To the right of each shipping service level is “view rate table,” which you can select to find out how much Amazon charges buyers for various items at that particular shipping service level and how much will be credited to your account.
Note that your shipping cost may be more or less than what Amazon charges the buyer and credits to your account, so you may gain or lose on shipping.
To offer additional shipping service levels or change the transit time for different levels, press the Edit button, enter your preferences, and press the Submit button.You can override your default shipping settings for individual products by entering your shipping preferences when you list products for sale.
Amazon return settings
Your return settings enable you to specify, for each market (country), where you want buyers to send product returns, the conditions under which you want to allow returnless refunds, whether you want to receive return request emails, how requests are authorized, and how return merchandise authorization (RMA) numbers are generated. To access your return settings from Seller Central, go to Settings, Return Settings. The Returns Settings page appears, as the figure shows. The Return Settings page.
Check the settings on all three tabs of the Returns Settings page to be sure they reflect your preferences:
- General Settings: On this tab, you have three options:
- Email Format: You can choose to receive return request email messages from buyers with links to Authorize, Close, or Reply to the request.
- Default Automated Return Rules: You may want to authorize each request when you’re getting started to stay on the safe side. Later, to save yourself valuable time, consider selecting I Want Amazon to Automatically Authorize All Requests That Meet Amazon Policy. The third option, to have Amazon automatically authorize all requests is risky; you could end up having Amazon authorize illegitimate return requests — for example, buyers consuming nearly an entire container of supplements and returning it.
- Return Merchandise Authorization (RMA) Number Settings: You can have Amazon generate a unique RMA for you or supply it yourself. Unless you have a good reason to use your own RMA numbers to track returns, save time by letting Amazon generate RMA numbers for you.
- Returnless Refund: The Returnless Refund tab contains an Add New Rule button you can click to display a form that enables you to add a rule that sets the conditions for a returnless refund (the customer keeps the product and is refunded her money). Enter a name for the rule, a price range, choose one or more product categories the rule applies to, choose one or more return reasons, and specify a return window (number of days from the estimated order delivery date). Click Save to save the rule. The rule is added to your Returnless Refund tab with buttons next to it to Edit or Delete it.
- Return Address Settings: Unless you specify otherwise, items you ship to customers are returned to the business address you entered when you enrolled as an Amazon Seller. You can press the Set the Address button on this tab to enter a return address that overrides the business address.
To the right of the three tabs is the Return Attribute Overrides button that enables you to download a template you can use to enter return attributes that override the default return settings for specified products. You’ll find a button for downloading the template and instructions in the template for filling it out.

