Geometric perspective can also create the illusion that you are either above or below the subject of a drawing. Using geometric perspective makes your drawings appear three-dimensional (rather than flat), and more realistic.
To get started with geometric perspective, you first need to acquaint yourself with the following:
- Horizon line: An imaginary horizontal line, sometimes referred to as eye level, which divides your line of vision when you look straight ahead.Objects below this line are below your eye level, and objects above this line are above your eye level. Artists draw horizon lines to accurately establish perspective in their drawings.
- Perspective lines: Straight lines, drawn at an angle from the edges of objects, back into perceived distant space, until they finally converge at a point on the horizon line. These lines establish guidelines for drawing objects in proper perspective.
- Angular lines: Straight lines that are neither parallel nor perpendicular to the horizon line.
- Vanishing point: The point on the horizon line where the angular perspective lines of an object visually continue past its edges and eventually converge. Objects become smaller and smaller the closer they are to the vanishing point and, at this point, seem to completely disappear (or vanish). Some objects can even have more than one vanishing point.
Lines of objects that are parallel or perpendicular (at a right angle) to the horizon line don't appear to go back in space (such as the top, bottom, and side edges of a building from a frontal view) and therefore don't meet the vanishing point.
Creating a drawing's horizon line
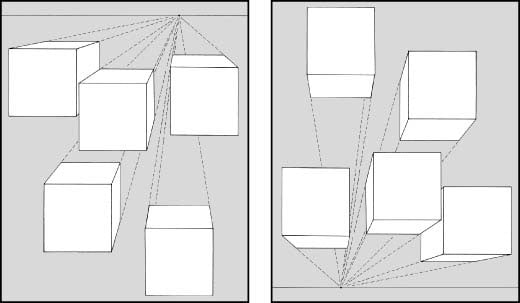
Always draw your horizon line parallel to the top and bottom of a square or rectangular drawing space. You determine the viewer's eye level by choosing the position of the horizon line. You control whether you want viewers to feel like they're above, below, or at eye level with the objects in your drawing.In the first drawing in Figure 1, the horizon line is close to the top of the drawing space, higher than the cubes. Imagine that you are standing on the top of a high cliff, or floating in a hot air balloon. The perspective lines of objects below you angle upward toward the horizon line and converge at the vanishing point.
If you want viewers of your drawings to feel like they are looking downward, draw the subjects below the horizon line.
Looking upward
The horizon line is below the cubes in the second drawing in Figure 1. You sense that you are below the cubes — maybe looking up into the sky or standing in a valley looking upward. The perspective lines of the objects all lead downward to the same vanishing point. The cubes almost look like helium-filled balloons, and the perspective lines seem to hold them anchored at the vanishing point. To create the illusion that the viewer is looking upward, draw your subjects above the horizon line.You are at eye level as you look into Figure 2. The horizon line is the first horizontal line, almost halfway down from the top of the drawing space.
Look at the angular lines (neither horizontal nor vertical) that define the edges of the objects, and visually follow them to the vanishing point on the horizon line. You should notice the following:
- Angular lines of objects at your eye level (touching the horizon line) converge both downward and upward.
- The lines of objects above your eye level (above the horizon line) converge downward.
- Angular lines of objects below your eye level (below the horizon line) converge upward.

Finding vanishing points
When an object's perspective lines recede into a properly placed vanishing point, your drawings appear more three-dimensional and visually correct. Finding and properly placing a vanishing point allows you to draw your subjects more realistically and in proper perspective.Many artists work from photos, without realizing that a camera lens can sometimes visually distort a scene. This may not be a problem when drawing landscapes. However, if you have human-made objects in your scene, such as buildings, stairs, or other objects with horizontal lines, you need to find the vanishing point and use geometric perspective to make them look visually correct.
The following steps explain how you can find a vanishing point in a photograph or sketch. These basic principles also apply to rendering a final drawing from one of your rough sketches.
Find an image that includes a level, man-made object with horizontal lines, such as a railing, deck, or wharf; or the roof, horizontal siding, or steps of a building. Then, follow these steps:
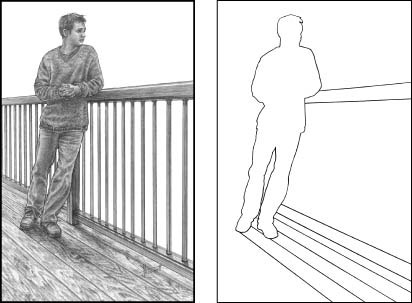
- Find an object in the image that you know is level and has more than one horizontal line. In Figure 3, the horizontal lines on the edge of the railing and the wooden planks in the deck are level.
- Tape a piece of tracing paper over the entire image.
- With a pencil and a ruler, outline the upper and lower horizontal edges of this object, as well as any other lines that you know to be parallel, such as railings, decks, or the upper and lower edges of doors and windows. Look at the outlines of the upper and lower edges of the railing and some of the spaces between the boards in the second drawing in Figure 3.Figure 3: Tracing the outlines to find the vanishing point.
- Tape your traced drawing to a larger sheet of drawing paper, leaving room to extend the horizontal lines of the object. Refer to the lines on your tracing and take note of the direction in which they point. You can visually identify which lines are going to eventually converge. Tape only the outer edges so that the tape doesn't tear the center area of your drawing paper when you remove it.
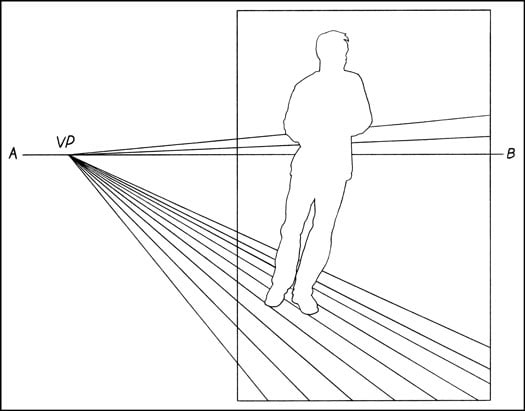
- Use your ruler and a pencil to extend all of the horizontal lines until they meet. Keep your lines light, so you can erase them later. Note the point where most lines converge. This is your vanishing point, which is located on the horizon line. When an object has only one vanishing point, its perspective is referred to as one-point perspective.
- Draw a straight line (the horizon line) through the vanishing point, horizontal to the top and bottom of your drawing paper. Figure 4 shows the location of the vanishing point and the horizon line (Line AB).
- Remove your tracing, redraw the lines of the object using the vanishing point as a guide, and complete your drawing.
Sometimes you can see more than one side of an object, such as a building. If the angle (or corner end) of the building is closer to you than one of its sides, you need to use this same method to locate the second vanishing point (this is called two-point perspective). Horizontal lines on other visible sides of this object also converge at vanishing points somewhere on the same horizon line.
Finding a horizon line and vanishing point in real life
To identify the horizon line in an actual scene, mark it with your eye level. Remember — your eye level and the horizon line are one and the same. Look straight ahead, and the horizon line is in front of you. Some clues for finding a vanishing point in a real setting include the following:- A building or object with horizontal lines provides a perfect clue. Follow the same procedure as in "Finding the vanishing point in a photograph or sketch" earlier in this article. However, instead of drawing the lines, you simply eyeball them to find the approximate position of your vanishing point. Then you mark it in your drawing.
- Two parallel lines of the edges of straight roads, railway tracks, and fences can lead you to the vanishing point.